Email marketing is an effective way of reminding people to visit your site and keep them updated through your newsletters. It is a great tool to reach to thousands of people who have voluntarily signed up to your mailing list to receive updates from you. However, before any email marketing efforts can be done, you will need to collect an email list.
Collecting an email list is not an easy task. Many email newsletter companies will provide you a link to a page that contains an email capture form that is hosted by them. This means every time a visitor tries to sign up to your mailing list they will have to exit your site.
Adding a New MailChimp Form
To add a new MailChimp list you will need to obtain an API key and the List Id of the specific list you want to display on your site. This setup enables you to host multiple MailChimp lists/forms even from multiple accounts.
Publishing MailChimp Forms
In pages/posts
Big Mailchimp adds a new meta-box in post/page edit page alongside of your WYSIWIG editor for ease of access. Use the Screen Options on the top right corner of the page to enable/disable this box. Use Big MailChimp meta box to select the list you want to display on a page/post. Toggle the checkbox to only display required fields if necessary. Click `Insert Into Page`. This will produce the shortcode and place it on the visual editor.

The generated shortcode format is
...
[bigmailchimp list_id=# required_fields=1]
...
The shortcode identifier is `bigmailchimp`. It takes two parameters list_id and required_fields.
list_id (required) The id of the list saved in your database.
default: none
required_fields (optional) Whether to show required fields only or display the entire form. Possible values are 0 or 1
default: 0
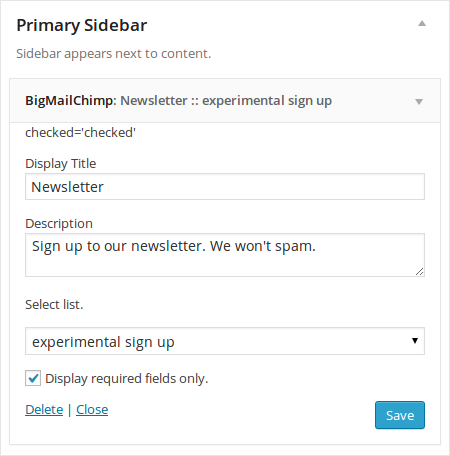
Display MailChimp forms in widget areas
Navigate to the Appearance menu and select Widgets. Under Available Widgets drag and drop the Big MailChimp widget into a widget area (Sidebar/Footer Area). Here you can add a title and a brief description to your form. Select the list/form you want to display from the widget settings and decide to display the full form or just the required fields. Repeat these step to add other lists/forms.
Collecting an email list is not an easy task. Many email newsletter companies will provide you a link to a page that contains an email capture form that is hosted by them. This means every time a visitor tries to sign up to your mailing list they will have to exit your site.
Adding a New MailChimp Form
To add a new MailChimp list you will need to obtain an API key and the List Id of the specific list you want to display on your site. This setup enables you to host multiple MailChimp lists/forms even from multiple accounts.
- Navigate to Big MailChimp page
- Click Add New
- Enter your Api Key and MailChimp List id
- Modify the submit button text or leave the default (Subscribe to list)
- Decide whether you want the double opt-in enabled or disabled
- Click Save Changes
Publishing MailChimp Forms
In pages/posts
Big Mailchimp adds a new meta-box in post/page edit page alongside of your WYSIWIG editor for ease of access. Use the Screen Options on the top right corner of the page to enable/disable this box. Use Big MailChimp meta box to select the list you want to display on a page/post. Toggle the checkbox to only display required fields if necessary. Click `Insert Into Page`. This will produce the shortcode and place it on the visual editor.
The generated shortcode format is
...
[bigmailchimp list_id=# required_fields=1]
...
The shortcode identifier is `bigmailchimp`. It takes two parameters list_id and required_fields.
list_id (required) The id of the list saved in your database.
default: none
required_fields (optional) Whether to show required fields only or display the entire form. Possible values are 0 or 1
default: 0
Display MailChimp forms in widget areas
Navigate to the Appearance menu and select Widgets. Under Available Widgets drag and drop the Big MailChimp widget into a widget area (Sidebar/Footer Area). Here you can add a title and a brief description to your form. Select the list/form you want to display from the widget settings and decide to display the full form or just the required fields. Repeat these step to add other lists/forms.
Comments · 0
Post a Comment