Symfony
Create a Web application with Symfony2 Framework - Part 1
In this article, I'm going to explain about how to create a Web application with Symfony2 Framework. In my previous article, I have explained about how to "Installing and Configuring Symfony2 framework on Linux Ubuntu OS". In this post we are going to learn the basics of create a web application with Symfony2 Framework.
Create a "Hello World" Web application with Symfony2 Framework:
The implementation of "Hello World" project proved to be relatively simple.
Create a "Hello World" Web application with Symfony2 Framework:
The implementation of "Hello World" project proved to be relatively simple.
- A task consists of a database row and has a name or title.
- A task can be assigned a priority.
- A task has a creator date.
- A task can be marked as completed.
- Index : All tasks are displayed and sorted by priority.
- add : In this action the task is created. After successful validation, the user is returned to the [index] Action.
- edit : In this action, an existing task is edited. After successful validation, the user is returned to the [index] Action.
- delete : Allows an existing task will be deleted.
- markAsDone : Allows an existing task is marked as completed.
- marksAsUndone : Allows an existing task is marked as completed.
Working in XAMPP environment:
To create a Web application with Symfony2 framework, we need to install XAMPP server that is under http://www.apachefriends.org/de/xampp.html. and to download the Symfony2 Framework Click Here.
XAMPP is a development environment it needs to be set-up a new named-vhost: www.testsmfony.local (this is valid for project name).
My new named-vhost is :
<VirtualHost *:80> DocumentRoot "C :/ path / to / project / web" ServerName testsmfony.local ServerAlias www.testsmfony.local <Directory "C :/ path / to / project / web" > Order Allow, Deny Allow from all AllowOverride all </ Directory> </ VirtualHost>
To note here is that the /web directory in Symfony2 folder is specified as the destination. Is a 403 error appears, the xampp apache errors.log file to crawl.
Thus the named vhost also can be used, even in the hosts file of the Windows domain name are marked as local address:
Www.testsmfony.local 127.0.0.1
127.0.0.1 testsmfony.local
After restarting the browser and the server XAMPP, now the changes should have been taken.
If you call now URL:
http://www.testsmfony.local/app_dev.php/demo/hello/User% 20and% 20Scandio% 20Tutorial
on should receive a Proket the example, which is automatically created by Symfony2.
"Hello User Scandio Tutorial!"
You get this message, you have done it, and has a running Symfony2 installed.
Console Configuration
To enjoy the full functionality of Symfony2, you must have the PHP CLI environment in the Windows environment variables are entered. (If you have not registered before then). This is not complicated, the path when calling the PHP CLI can be specified.
To edit the PATH environment variable on Windows 7, you will navigate to: Start -> Control Panel -> System and Security -> System -> Advanced System Settings -> Advanced -> Environment Variables -> System Variables -> Path . then "Edit ..." and click on the end of the string to specify the path to the current PHP CLI. In my example, this is: "C:\xampp\php". There is the php.exe.
Configuration of the Symfony2 project:
First, the connection to the MySQL database is configured.
For this purpose we consider the /app/config/parameters.ini File:
database_driver = pdo_mysql
DATABASE_HOST = localhost
database_name = scandio_project_testsmfony
database_user = root
database_password =
The configurations should here be adapted to the current system. The database is ONLY for testing purposes as root reachable.
Unfortunately, there is an unprecedented bugs fixed bug in Doctrine 2 to thank for that one in the Doctrine Configs not specify MySQL COLLATE can. This is the default COLLATE use the current database. That means in the default configuration of XAMPP LATIN_1 ... Basically here utf8_general_ci should ALWAYS be used.
To avoid the error, use the following SQL:
CREATE DATABASE scandio_project_testsmfony ` DEFAULT CHARACTER SET utf8 COLLATE utf8_general_ci;
Drupal
Steps to create Virtual Hosts for Drupal on Linux Ubuntu
In this article, I'm going to explain about, How to create virtual Hosts for Drupal On Linux Ubuntu. By Using virtual host settings, we can access site as a domain like test.sitename.com instead of access like localhost/sitename. Here are the steps to create a virtual host for Drupal on Linux Ubuntu.
Step 1:
Assume your Drupal codes placed at /var/www/testDrupal
Step 2:
Access your Drupal site by using http://localhost/testDrupal
Step 3:
If you want to access the same site using test.testDrupal.com to solve path issues and wysiywig editor images, and files link issues.
Step 4:
Open the below file in your editor.
/etc/apache2/sites-enabled/vhosts.conf
Step 5:
Edit the file and add the below code in your vhosts.conf file.
<VirtualHost *:80>
ServerName test.testDrupal.com
ServerAlias www.test.testDrupal.com
DocumentRoot /var/www/testDrupal
</VirtualHost>
Step 6:
Open the file /etc/hosts in your editor and add the below code.
127.0.0.1 test.testDrupal.com
Step 7:
Restart your apache server by running below command using console.
sudo /etc/init.d/apache2 restart
Step 8:
Now you can access the site using http://test.testDrupal.com to view drupal instance in direct domain.
Magento
Magento - Steps to add Custom Tabs to the Product Admin
In this article, we are going to discuss about How to add custom table to the magento product admin. In Magento, it is possible to add new attributes to each product models and edit the values for these attributes on the Product Edit Page. This article provide a facility for processing that data when the user hits the Save button.
Step 1:
Create the extension's setup file, which loads the extension into Magento. Add the below code in app/etc/modules/Phpcmsframework_Customtabs.xml
<?xml version="1.0"?>
<config>
<modules>
<Phpcmsframework_Customtabs>
<active>true</active>
<codePool>local</codePool>
</Phpcmsframework_Customtabs>
</modules>
</config>
This file will register the extension in Magento, telling it to look in the app/code/local/Phpcmsframework/Customtabs/ directory for the extension's code.
Step 2:
The next file we make is the extension's config file. This file is a more detailed setup file, containing information about the extension's classes, layout files and everything else we need to make it work.
Notice the events section of this file (below)? To save the product data, we listen for an event that is triggered when ever a product is saved in the Magento Admin. This allows us to access the custom data we have created in the tab and process/save it.
Add the below code in app/code/local/Phpcmsframework/Customtabs/etc/config.xml
<?xml version="1.0"?>
<config>
<modules>
<Phpcmsframework_CustomTabs>
<version>0.1.0</version>
</Phpcmsframework_CustomTabs>
</modules>
<global>
<blocks>
<customtabs>
<class>Phpcmsframework_Customtabs_Block</class>
</customtabs>
</blocks>
<models>
<customtabs>
<class>Phpcmsframework_Customtabs_Model</class>
</customtabs>
</models>
</global>
<adminhtml>
<layout>
<updates>
<customtabs>
<file>customtabs.xml</file>
</customtabs>
</updates>
</layout>
<events>
<catalog_product_save_after>
<observers>
<Phpcmsframework_save_product_data>
<type>singleton</type>
<class>customtabs/observer</class>
<method>saveProductTabData</method>
</Phpcmsframework_save_product_data>
</observers>
</catalog_product_save_after>
</events>
</adminhtml>
</config>
Step 3:
Add the below code in app/code/local/Phpcmsframework/Customtabs/Block/Adminhtml/Catalog/Product/Tab.php
<?php
class Phpcmsframework_Customtabs_Block_Adminhtml_Catalog_Product_Tab
extends Mage_Adminhtml_Block_Template
implements Mage_Adminhtml_Block_Widget_Tab_Interface {
/**
* Set the template for the block
*
*/
public function _construct()
{
parent::_construct();
$this->setTemplate('customtabs/catalog/product/tab.phtml');
}
/**
* Retrieve the label used for the tab relating to this block
*
* @return string
*/
public function getTabLabel()
{
return $this->__('My Custom Tab');
}
/**
* Retrieve the title used by this tab
*
* @return string
*/
public function getTabTitle()
{
return $this->__('Click here to view your custom tab content');
}
/**
* Determines whether to display the tab
* Add logic here to decide whether you want the tab to display
*
* @return bool
*/
public function canShowTab()
{
return true;
}
/**
* Stops the tab being hidden
*
* @return bool
*/
public function isHidden()
{
return false;
}
/**
* AJAX TAB's
* If you want to use an AJAX tab, uncomment the following functions
* Please note that you will need to setup a controller to recieve
* the tab content request
*
*/
/**
* Retrieve the class name of the tab
* Return 'ajax' here if you want the tab to be loaded via Ajax
*
* return string
*/
# public function getTabClass()
# {
# return 'my-custom-tab';
# }
/**
* Determine whether to generate content on load or via AJAX
* If true, the tab's content won't be loaded until the tab is clicked
* You will need to setup a controller to handle the tab request
*
* @return bool
*/
# public function getSkipGenerateContent()
# {
# return false;
# }
/**
* Retrieve the URL used to load the tab content
* Return the URL here used to load the content by Ajax
* see self::getSkipGenerateContent & self::getTabClass
*
* @return string
*/
# public function getTabUrl()
# {
# return null;
# }
}
Step 4:
This is the layout file for the Adminhtml section of the extension. In here we will include the tab on the Magento Product edit page.
Add the below xml code in, app/design/adminhtml/default/default/layout/customtabs.xml
<?xml version="1.0"?>
<layout>
<adminhtml_catalog_product_edit>
<reference name="product_tabs">
<action method="addTab">
<name>my_custom_tab</name>
<block>customtabs/adminhtml_catalog_product_tab</block>
</action>
</reference>
</adminhtml_catalog_product_edit>
</layout>
Step 5:
This file is quite simple but without it, nothing will show on the product edit page. The last thing to do before we can see our tab in action is to create our new template file.
Add the below code in, app/design/adminhtml/default/default/template/customtabs/catalog/product/tab.phtml
<?php
/**
* Custom tab template
*/
?>
<div class="input-field">
<label for="custom_field">Custom Field</label>
<input type="text" class="input-text" name="custom_field" id="custom_field" />
</div>
Step 6:
Testing Our Custom Magento Admin Tab
Now that we have the code in place, let's refresh our cache, go to a product edit page and see the tab in action!
Did it work? If it didn't work, check through your XML again as a slight error in any of that will stop everything working.
Now that we have our tab, let's take a look at how to process the data once the user hits the 'Save' button.
Step 7:
Saving our Custom Tab Data
To access the data during the saving process, we have hooked into an event called catalog_product_save_after (see config.xml above). This event is triggered each time a product model is saved. As we have declared our observer for this event inside the adminhtml block, we will only trigger our code when a product model is saved from the Magento Admin.
app/code/local/Phpcmsframework/Customtabs/Model/Observer.php
<?php
class Phpcmsframework_Customtabs_Model_Observer
{
/**
* Flag to stop observer executing more than once
*
* @var static bool
*/
static protected $_singletonFlag = false;
/**
* This method will run when the product is saved from the Magento Admin
* Use this function to update the product model, process the
* data or anything you like
*
* @param Varien_Event_Observer $observer
*/
public function saveProductTabData(Varien_Event_Observer $observer)
{
if (!self::$_singletonFlag) {
self::$_singletonFlag = true;
$product = $observer->getEvent()->getProduct();
try {
/**
* Perform any actions you want here
*
*/
$customFieldValue = $this->_getRequest()->getPost('custom_field');
/**
* Uncomment the line below to save the product
*
*/
//$product->save();
}
catch (Exception $e) {
Mage::getSingleton('adminhtml/session')->addError($e->getMessage());
}
}
}
/**
* Retrieve the product model
*
* @return Mage_Catalog_Model_Product $product
*/
public function getProduct()
{
return Mage::registry('product');
}
/**
* Shortcut to getRequest
*
*/
protected function _getRequest()
{
return Mage::app()->getRequest();
}
}
Symfony
Installing and Configuring Symfony2 framework on Linux Ubuntu OS
In this article, I'm going to explain about How to Install and configure Symfony 2 framework on Linux Ubuntu operating system. Here I have explained step by step procedure to install and configure Symfony 2 framework on linux ubuntu operating system.
Step 1:
The below are required to run symfony framework on linux ubuntu operating system.
Download the Symfony framework from http://symfony.com/download and place the tgz folder inside your web root, i.e, /var/www/
Step 3:
Extracts the contents of the folder and rename the folder like "my_symfony_project"
Step 4:
After placing the code, go to http://localhost/my_symfony_project/web/config.php to check whether everything is working fine or not.
Step 5:
Go to http://localhost/my_symfony_project/web/config.php to access your Symfony framework project welcome page. You will see screen like below once you have successfully installed Symfony2 instance.

Now, Symfony2 instance is up and running in your local machine. Drop comments if you have difficuly in setting up instance.
Step 1:
The below are required to run symfony framework on linux ubuntu operating system.
- PHP 5.3.2
- Apache Webserver.
- MySql Database.
- Sqllite 3 needs to be enabled.
- JSON needs to be enabled
- ctype needs to be enabled
- Your PHP.ini needs to have the date.timezone setting
Download the Symfony framework from http://symfony.com/download and place the tgz folder inside your web root, i.e, /var/www/
Step 3:
Extracts the contents of the folder and rename the folder like "my_symfony_project"
Step 4:
After placing the code, go to http://localhost/my_symfony_project/web/config.php to check whether everything is working fine or not.
Step 5:
Go to http://localhost/my_symfony_project/web/config.php to access your Symfony framework project welcome page. You will see screen like below once you have successfully installed Symfony2 instance.

Now, Symfony2 instance is up and running in your local machine. Drop comments if you have difficuly in setting up instance.
Magento
Magento - Creating and accessing An External Database Connection
In this article I'm going to explain about How t create and access an external database connection in Magento. Most of the developers facing some troubles when trying to create and access the external database connection in Magento. This article will help the developers to reach their goals by creating and accessing the external database connection in Magento.
Step 1 : Creating the database connection
To create the external database connection you need to create a custom module and add the following code to your config.xml. The code is used to get the external database connection to be work.
<?xml version="1.0"?>
<config>
<modules>
<Phpcmsframework_Externaldb>
<version>0.1.0</version>
</Phpcmsframework_Externaldb>
</modules>
<global>
<resources>
<externaldb_write>
<connection>
<use>externaldb_database</use>
</connection>
</externaldb_write>
<externaldb_read>
<connection>
<use>externaldb_database</use>
</connection>
</externaldb_read>
<externaldb_setup>
<connection>
<use>core_setup</use>
</connection>
</externaldb_setup>
<externaldb_database>
<connection>
<host><![CDATA[localhost]]></host>
<username><![CDATA[db_username]]></username>
<password><![CDATA[db_password]]></password>
<dbname><![CDATA[db_name]]></dbname>
<model>mysql4</model>
<type>pdo_mysql</type>
<active>1</active>
</connection>
</externaldb_database>
</resources>
</global>
</config>
After adding the above code to your config.xml, clear the cache and from now on, each time you load Magento, a second database connection will be created.
Step 2: Accessing the Database
You can use the following Zend_Db to test your database connection is working or not.
<?php
$resource = Mage::getSingleton('core/resource');
$conn = $resource->getConnection('externaldb_read');
$results = $conn->query('SELECT * FROM tblName');
print_r($results)
This works fine, however kind of takes the point away from having this connection available in Magento.
Step 3: Accessing The External Database Using Models
Using models to access the database keeps our code style uniform throughout Magento. Also, it means we can integrate any other CMS or database driven application without learning it's coding practices. To achieve this, simply add models to your custom module like you would for any other module.
Create the following files
code/local/Phpcmsframework/Externaldb/Model/Book.php
<?php
class Phpcmsframework_Externaldb_Model_Book extends Mage_Core_Model_Abstract
{
public function _construct()
{
$this->_init('externaldb/book');
}
}
code/local/Phpcmsframework/Externaldb/Model/Mysql4/Book.php
<?php
class Phpcmsframework_Externaldb_Model_Mysql4_Book extends Mage_Core_Model_Mysql4_Abstract
{
public function _construct()
{
$this->_init('externaldb/book', 'book_id'); // book_id refers to the primary key of the book table
}
}
code/local/Phpcmsframework/Externaldb/Model/Mysql4/Book/Collection.php
<?php
class Phpcmsframework_Externaldb_Model_Mysql4_Book_Collection extends Mage_Core_Model_Mysq4_Collection_Abstract
{
public function _construct()
{
$this->_init('externaldb/book');
}
}
Adding the Models to The Config
To inform Magento about our models, we need to register them in config.xml. Below is an updated version of config.xml with the models for Book registered.
<?xml version="1.0"?>
<config>
<modules>
<Phpcmsframework_Externaldb>
<version>0.1.0</version>
</Phpcmsframework_Externaldb>
</modules>
<global>
<models>
<externaldb>
<class>Phpcmsframework_Externaldb_Model</class>
<resourceModel>externaldb_mysql4</resourceModel>
</externaldb>
<externaldb_mysql4>
<class>Phpcmsframework_Externaldb_Model_Mysql4</class>
<entities>
<book>
<table>library_book</table>
</book>
</entities>
</externaldb_mysql4>
</models>
<resources>
<externaldb_write>
<connection>
<use>externaldb_database</use>
</connection>
</externaldb_write>
<externaldb_read>
<connection>
<use>externaldb_database</use>
</connection>
</externaldb_read>
<externaldb_setup>
<connection>
<use>core_setup</use>
</connection>
</externaldb_setup>
<externaldb_database>
<connection>
<host><![CDATA[localhost]]></host>
<username><![CDATA[db_username]]></username>
<password><![CDATA[db_password]]></password>
<dbname><![CDATA[db_name]]></dbname>
<model>mysql4</model>
<type>pdo_mysql</type>
<active>1</active>
</connection>
</externaldb_database>
</resources>
</global>
</config>
Testing The Models
Testing them is easy enough, just treat them like normal Magento models.
<?php
// Load the book with a primary key value of 4
$_book = Mage::getModel('externaldb/book')->load(4);
// This would print out the value in the field isbn in the external database
echo $_book->getIsbn();
//You can even update records!
$_book->setName('1984');
$_book->setAuthor('George Orwell');
try {
$_book->save();
} catch (Exception $e) {
exit($e->getMessage());
}
Joomla
Download Dropbox Component and Plugin for Joomla 1.5 and Joomla 2.5
With this Dropbox component you can connect joomla to www.dropbox.com or www.sugarsync.com. You can publish files, view the pictures in a directory and let users upload files to dropbox / sugarsync.
You can use the extension as a component or as a plugin
Version 1.x is for Joomla 1.5.x version 2.x is for Joomla 1.6 and 1.7
Caution!: The version for Joomla 1.6 / 1.7 is still beta - please report problems in the forum
NEW: since 2.0_beta1 its possible to create private folders for every user
Requirements:
- PHP 5 >= 5.2.0 with PECL json >= 1.2.0
- cURL with SSL
- Joomla 1.5.x / 1.6.x / 1.7.x
To Download the Component and Plugin - Click Here
For Demo - Click Here
For Support - Click Here
For Documentation - Click Here
CodeIgniter
Codeigniter - Verify Captcha with Ajax
In this article, we are going to discuss about How to verify captcha with Ajax in CodeIgniter websites. Captcha is necessary to avoid spam. To avoid spam mails/accounts, we are using Captcha in forms. If we see with end user point of view, a user feel uncomportable when he/she has to give a right verification code and also have to receive an error message if it is wrong. If we use ajax to verify the captcha, it reduces the user's troubles.
We can check captcha on blur event or on submitting a form and alert the user about invalid code entered.
Here I have mentioned some steps to add captcha in your form and How to verify that captcha with Ajax in Codeigniter.
Step 1 :
Use the below code to show captcha in Codeigniter (CI).
function Ajax_captcha(){
var code = $("#code").val(); // get the code entered
if(code.length>1){
$('#Loading').show(); // show the loader image
$.post("<?php echo base_url()?>Site/Ajax_Captcha",{
code: $('#code').val()
}, function(response){
$('#Ifno').fadeOut();
setTimeout("RemoveAJAXCaptcha('Info', '"+escape(response)+"')", 400);
});
}
return false;
}
// this function will hide the loader image and show the result as inner html
function RemoveAJAXCaptcha(id, response){
$('#Loading').hide();
$('#'+id).html(unescape(response));
$('#'+id).fadeIn();
}
Step 2:
Add the below code in your HTML.
<input id="code" name="code" type="text" value="" onblur="return Ajax_captcha();" />
<span id="Info"></span>
<span id="Loading">
<img src="<?php echo base_url()?>images/loader.gif" alt="" />
</span>
Step 3:
Add the below code in your controller file.
function Ajax_Captcha($code,$this->session->userdata('yourSessionVarOfCaptcha'))
{
if ($code==strtoupper($this->session->userdata('yourSessionVarOfCaptcha')))
{
return true;
}
else
{
return false;
}
}
I hope this article may helpful for you to add and verify the captcha with Ajax in CodeIgniter.
Magento
Magento - Resize images using Varien_Image class
In this article, We are going to discuss about How to resize the images in Magento using "Varien_Image" Class. Magento also having the in-built library to resize the image in height and width. You can resize the product images using catalog helper. If you want to upload and resize the images which are not uploaded for product, then this article will help you to how to resize images, such as needing to resize a custom image and display it on the site in special sized areas.
Here I have mentioned the code to resize the images using "Varien_Image" class. This code resizes the images from a specific directory/folder and save the resized image to some other directory/folder.
$_imageUrl = Mage::getBaseDir(‘media’).DS.$image;
$imageResized = Mage::getBaseDir(‘media’).DS.“resized”.$image;
if (!file_exists($imageResized)&&file_exists($_imageUrl)) :
$imageObj = new Varien_Image($_imageUrl);
$imageObj->constrainOnly(TRUE);
$imageObj->keepAspectRatio(TRUE);
$imageObj->keepFrame(FALSE);
$imageObj->resize(140, 140);
$imageObj->save($imageResized);
endif;
Hope this article will work for you.
Joomla
Joomla - Register new component into database
In my previous articles, I have explained about How to create front end component and also How to create a back end component in Joomla. In this article, We are going to discuss about How to register the new component into database. The purpose of registering the component into database is to publish the component in the component menu and also it can e choosen as the menu item type.
Here are the steps to register the component into database in joomla.
Step 1:
Open the "phpmyadmin" in your browser using "http://localhost/phpmyadmin/".
Step 2:
Select your "joomla" database from the list.
Step 3:
Find the "jos_components" table from the list of tables present in your database.
Step 4:
Find the "insert" tab. Check the below image. click on the "insert" tab.

Step 5:
When you click on the "insert" you will get the form like the below image.
 Step 6:
After entering all the fields in "jos_components" table, Click on the GO button.
Step 7:
Now you can check the your joomla administrator components, to check whether it is succeeded or not.

My Previous posts related to this are.,
Create Back End Component in Joomla - Step by step procedure
Create Front End Component in Joomla - Step by step procedure
Here are the steps to register the component into database in joomla.
Step 1:
Open the "phpmyadmin" in your browser using "http://localhost/phpmyadmin/".
Step 2:
Select your "joomla" database from the list.
Step 3:
Find the "jos_components" table from the list of tables present in your database.
Step 4:
Find the "insert" tab. Check the below image. click on the "insert" tab.

Step 5:
When you click on the "insert" you will get the form like the below image.

After entering all the fields in "jos_components" table, Click on the GO button.
Step 7:
Now you can check the your joomla administrator components, to check whether it is succeeded or not.

My Previous posts related to this are.,
Create Back End Component in Joomla - Step by step procedure
Create Front End Component in Joomla - Step by step procedure
CodeIgniter
Upload and Convert video to FLV using FFmpeg in Codeigniter
In this article, we are going to discuss about How to upload and convert video into FLV format using FFMpeg in Codeigniter. FFMpeg commands are running only in Linux environment. If you want to use it in windows, you need download ffmpeg.exe file. Click here to download FFMpeg.exe. Download the FFmpeg executable file and place it in your root folder. If you are using Linux server, Use print phpinfo() function to check whether your hosting server has FFmpeg installed or you need it to be installed.
Use the below code for uploading and converting the video file in Codeigniter.
$file = 'video_file';
$config['upload_path'] = './video_folder/';
$config['allowed_types'] = 'mov|mpeg|mp3|avi';
$config['max_size'] = '50000';
$config['max_width'] = '';
$config['max_height'] = '';
$this->upload->initialize($config);
$this->load->library('upload', $config);
if(!$this->upload->do_upload($file))
{
// If there is any error
$err_msgs .= 'Error in Uploading video '.$this->upload->display_errors().'<br />';
}
else
{
$data=array('upload_data' => $this->upload->data());
$video_path = $data['upload_data']['file_name'];
$directory_path = $data['upload_data']['file_path'];
$directory_path_full = $data['upload_data']['full_path'];
$file_name = $data['upload_data']['raw_name'];
// ffmpeg command to convert video
exec("ffmpeg -i ".$directory_path_full." ".$directory_path.$file_name.".flv");
// $file_name is same file name that is being uploaded but you can give your custom video name after converting So use something like myfile.flv.
/// In the end update video name in DB
$array = array(
'video' => $file_name.'.'.'flv',
);
$this->db->set($array);
$this->db->where('id',$id); // Table where you put video name
$query = $this->db->update('user_videos');
}
CodeIgniter
Create Ajax Pagination in CodeIgniter - Step by step procedure
In my previous article, I have explained about how to install and configure the Codeigniter on your localhost. In this article, I'm going to describe How to create a Ajax pagination in Codeigniter. Codeigniter has many buil-in classes and plugins. Codeigniter pagination is easy to use.
Step 1:
Download the Pagination classes from the Codeigniter site.
Click Here to download the Codeigniter Ajax pagination library files.
Step 2:
Put the Ajax pagination library files to the "system/libraries" folder.
Step 3:
Also download the prototype.js file and place anywhere on your root.
Step 4:
Create a database table to store and retrieve the records to apply the pagination.
CREATE TABLE `my_best_friends` (
`f_id` int(11) NOT NULL auto_increment,
`f_name` varchar(100) NOT NULL,
`f_phone` int(11) NOT NULL,
`f_email` int(11) NOT NULL,
`f_address` int(11) NOT NULL,
PRIMARY KEY (`f_id`)
)
Step 5:
Add the below code in your "Controller" file
class Paging extends Controller {
function Paging(){
parent::Controller();
$this->load->helper(array('form','url'));
$this->load->helper('text');
$this->load->library('Ajax_pagination');
}
function index()
{
redirect ('paging/my_friends');
}
function my_friends()
{
$pdata['TotalRec'] = $this->FriendsModel->TotalRec();
$pdata['perPage'] = $this->perPage();
$pdata['ajax_function'] = 'get_friends_ajax';
$subdata['paging'] = $this->parser->parse('paging', $pdata,
TRUE);
$subdata['all_friends'] = $this->FriendsModel->my_friends
($this->perPage());
$data['body_content'] = $this->parser->parse('friend_list',
$subdata, TRUE);
$this->load->view('main',$data);
}
function get_friends_ajax()
{
$pdata['TotalRec'] = $this->FriendsModel->TotalRec();
$pdata['perPage'] = $this->perPage();
$pdata['ajax_function'] = 'get_friends_ajax';
$data['paging'] = $this->parser->parse('paging', $pdata, TRUE);
$data['all_friends'] = $this->FriendsModel->my_friends($this->perPage());
$this->load->view('friend_list',$data);
}
function PerPage()
{
return 5;
}
}
Step 6:
Add the below code in your "Model" file
class FriendsModel extends Model
{
function FriendsModel()
{
parent::Model();
}
function TotalRec()
{
$sql = "SELECT * FROM my_friends";
$q = $this->db->query($sql);
return $q->num_rows();
}
function my_friends($perPage)
{
$offset = $this->getOffset()
$query ="SELECT * FROM my_friends Order By f_id Desc LIMIT ".$offset.", ".$perPage;
$q = $this->db->query($query);
return $q->result();
}
function getOffset()
{
$page = $this->input->post('page');
if(!$page):
$offset = 0;
else:
$offset = $page;
endif;
return $offset;
}
}
Step 7:
Add the below code in your "paging.php" file in "application/views/" folder.
$config['first_link'] = 'First';
$config['div'] = 'container'; //Div tag id
$config['base_url'] = base_url().'paging/'.$ajax_function;
$config['total_rows'] = $TotalRec;
$config['per_page'] = $PerPage;
$config['postVar'] = 'page';
$this->ajax_pagination->initialize($config);
echo $this->ajax_pagination->create_links();
Step 8:
Add the below code in your "friend_list.php" file in "application/views/" folder.
<table border="1" width="200">
<tbody>
<tr>
<td>Friend Name</td>
<td>Friend Phone</td>
<td>Friend Address</td>
</tr>
foreach($all_friends as $row)
{
<tr>
<td>echo $row->f_name</td>
<td>echo $row->f_phone</td>
<td>echo $row->f_address</td>
</tr>
}</tbody>
</table>
Step 9:
In main home page.,
Add the below code to your "main.php" file in "application/views/" folder. This file
contains your html code and all css and js files.
<div id="container">
echo @$body_content;
</div>
Click Here to learn more about How to Install and configure codeigniter on your localhost.
CodeIgniter
Installing and Configuring Codeigniter framework on localhost
In this tutorial, we are going to discuss about how to install and configure the Codeigniter (CI) PHP framework on your localhost. Configuring codeigniter to our localhost is so simple and easy. In this article I will explain the step bt step procedure to install and configure Codeigniter framework on your localhost.
1, Download Codeigniter system folder from codeigniter.com
2, Now unzip it and paste it
3, After unzipping folder copy this folder to your localhost server and change its name to some thing like “mywork”.
4, Update system/application/config/config.php file. Change base url to your localhost path.
5, Give DB name to system/application/config/database.php which you create on localhost.
Now its ready to use just go to your browser and access your first testing codeigniter configured site on localhost.
Zend
Reading and Writing Session Data Using Zend Session Namespace
In this article we are going to discuss about how to reading and writing the session data using the Zend Session Namespace in Zend Framework. Also discuss about some useful techniques of Zend Framework session and Session Namespace.
In Zend framework, you can use both Zend_Session and Zend_Session_Namespace which extends abstract class Zend_Session_Abstract. So these two inherited methods are available in Zend_Session_Abstract automatically. In Zend/Session/Abstract.php file, you can find all functions related to session handling.
$mysession = new Zend_Session_Namespace(’Namespace’);
The argument for namespace is optional, but it’s better to pass it. if you don’t pass it, Zend Session Namespace will assign its name a string “default”. To store values in session variable, you will need to do the following.
$mysession->fruits = ‘Apple’;
Below is the example code to retrieve values from session.
$yoursession = new Zend_Session_Namespace(’Namespace’);
$fruits = $yoursession->fruits;
If you want to go deep, you can get many useful functions in Zend_Session_Abstract.php, Zend_Session_Nampspace.php, and Zend_Session.php.
Wordpress
A step by step procedure to develop wordpress plugin
WordPress provides easy way to create and manage your blog. you can easily modify, customize and enhance functionality of your WordPress blog. You don’t need to change the core functionality of your WordPress blog. it provides easy way to add functionality with WordPress plugins. A WordPress plugin is a progam or can say a set of one or more functions which is written in the PHP scripting language which adds a specific set of features to your WordPress blog.
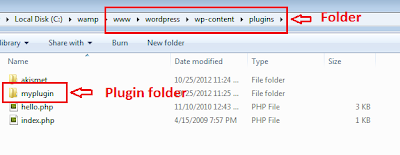
Step 1 : File Structure
In wordpress, the plugin directory is available inside the wp-content directory. All plugin folders are available inside the wp-content folder. For smaller plugins which only have single filname.php file, can be placed directly into plugin/ directory. Howerver when you have more complicated functionality then it is useful to create a sub directory named after your plugin. you can also keep your Javascript, CSS, and html include into your individual plugin.You can also add read.txt if you are palnning to offering your plugin for download. This file will contain your plugin name and what the plugin does.
Step 2 : Writing code for simple plugin
Create a simple php file named with the plugins specified name.
Ex: Here my plugin name is "myplugin", so my file name is "myplugin.php".
Write the following codes inside the "myplugin.php" file.
<?php
/*
Plugin Name: My Plugin
Plugin URI: http://www.pluginurlhere.com/
Version: Current Version
Author: Name please
Description: What does your plugin do and what features does it offer…
*/
?>
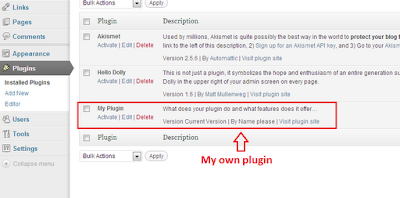
Once you write the code the in the php file, it will show up in your admin panel. For your reference, check the below image.
Step 3 : Naming conventions and Best practices
WordPress doesn’t need any specific code structure into your plugin. if you are well versed with php oops concept, then its best to handle using class and functions.
Since there are so many internal functions already defined you can avoid duplicates by prefixing a label to all your variables and function names.
<?php
define("Variable", "Varriable label value");
function content_example_function( $limit ) {
// some code goes here
}
?>
Step 4 : Diving Into Hooks, Actions and Filters
Hooks are provided by wordpress which allows your plugin to hook into the core functionality of your blog. The hooks are divided into two parts that’s Actions and Filters.
Actions are occured during specific events. Below are list of few important actions of Worpdress.
add_action('save_post', 'notify');
In above code have two variables, the first holds the name of our hook we’re targeting. In this case save_post which means whenever a new post is saved we’re going to call our function defined in the second parameter. You could obviously update notify to be whatever function name you’d want to run, however this isn’t required for our current example plug-in.
Filters are occurred to modify text of various types before adding it to the database or sending it to the browser screen. your plugin can specify that one or more of its PHP functions is executed to modify specific types of text at these times, using the Filter API. For example, you may create a filter to change $the_content which is a variable set by WordPress containing the entire post content of a WordPress article. For our plug-in we will be taking $the_content and shortening the length of characters into an excerpt.
Actually Filters are handy when you are writing plug-ins to customize the looks and feel of your blog. These are especially popular when writing sidebar widgets or smaller functions to change how a post should be displayed. Below is a sample line of code showing how to apply a filter.
add_filter('wp_title', 'func');
Step 5 : Complete Plugin Logic
This is a complete logic of our plugin. it can be placed inside your theme’s function.php file. the purpose of this code is to limit the range of post content.
<?php
function myplugin_excerpts_content( $limit ) {
$content = explode( ' ', get_the_content(), $limit );
if ( count( $content ) >= $limit ) {
array_pop( $content );
$content = implode(" ",$content).'…';
} else {
$content = implode(" ",$content);
}
$content = preg_replace('/\[.+\]/','', $content);
$content = apply_filters('the_content', $content);
return $content;
}
?>
The above code just require general understanding of how your functions should be written. you will notice that we are using a call to apply_filters which is another WordPress-specific function.
The function above is named myplugin_excerpts_content(). This only requires 1 parameter named $limit. This could also be shortened to $limit which should store an integer specifying how many characters to limit your excerpt to. The content is used on full post pages and also static pages like about us, contact etc.
<?php
echo myplugin_excerpts_content(60);
// display page content limited at 60 chars
?>
Step 6 : Installing And Running The Plugin
This is just a general description how to develop wordpress plugin. if you want to run the code above. simply download the plugin file and rename it to .php file. Then upload this file to your blog’s /wp-content/plugins directory.
After uploading plugin file, go the the admin panel and browse your plugin and make it active. Once you activate nothing new will happen, until we manually add in our function call. To do this simply navigate Appearance -> Editor and look for single.php. This file contains all the HTML/CSS for your basic article post page. Scroll down until you find the_content() and replace with the example code above. this will limit all your article pages to 60 charaters. you can also add this function to other files.
In this article I have presents just a general idea of how you can start working with WordPress plugin development AS you gone through this small article, you can understand that plugin has very vast and deep internal functionality. But you can easily command over by start from here or also through WordPress official Documentation, development community and forums.
No more posts to load.