Magento
Steps to setup Authorize.net Direct Post Method in Magento
In this article, we are going to discuss about How to integrate and setup the Authorize.net Direct post method in Magento. Authorize.net's Direct Post Method of payment gateway integration is a great option for Magento sites because it allows for a seamless customer experience while simplifying PCI compliance by keeping all sensitive credit card information off of the Magento server. Configuring Magento for use with Direct Post Method (DPM) is supposed to be quick and easy and it can be as long as you aware of a few less than obvious steps.
Step 1 :
Make sure that your Authorize.net account is a "Card Not Present" (CNP) account. You can confirm whether or not your Authorize.net account is setup for CNP transactions by logging in to the Merchant Account Admin and verifying that you have CNP features like Recurring Billing and Fraud Detection Suite listed in the Tools section.
If you do not see these options or you get errors like "Transactions of this market type cannot be processed on this system" when attempting to authorize payments, the issue is most likely that the account is setup for card present transactions only. If you are using a test account the easiest solution is to just create a new account and make sure to select Card Not Present.
Step 2 :
Make sure to set an MD5-Hash. DPM uses an MD5-Hash as a sort of secret key that is set in in the auth.net merchant admin and the Magento admin to help secure comminication between your magento store and auth.net. If during checkout, after entering credit card information and clicking "Place Order", you get a pop-up alert saying "Response hash validation failed. Transaction declined." the problem is most likely that this is not set.
Step 3 :
Set an MD5-Hash in the Authorize.net merchant admin under Settings > Security Settings > General Security Settings > MD5-Hash. Then enter that same value in the Magento Admin under System > Configuration > Payment Methods > Authorize.net Direct Post > Merchant MD5.
Step 4 :
Make sure that your server's time is set correctly. DPM makes use of a timestamp as a security measure and to help synchronize requests. If the server's time is incorrect you may receive a pop up stating "Gateway error: This transaction cannot be accepted." This is a generic error message. To get more specific error information you can go into app/code/core/Mage/Authorizenet/Model/Directpost.php and either log or dump $response in function process() by doing something like var_dump($reponse); die(); to output the response from auth.net.
If you get a response code 3 with a response reason code of 97 the timestamp value submitted in x_fp_timestamp is either 15 minutes ahead, or 15 minutes behind in Greenwich Mean Time (GMT) (this is the equivalent of 900 seconds ahead or 900 seconds behind in Coordinated Universal Time, or UTC). You can test your timestamps accuracy using this tool http://developer.authorize.net/tools/responsecode97/ .
On linux you can get the server time using the date command. If it is incorrect consider setting up Network Protocol Time by doing soething like this: http://alienlayer.com/install-and-configure-ntp-to-synchronize-the-system-clock-on-centos/
Step 5 :
Make sure to set the Gateway URL correctly. For test accounts Test Mode should be set to NO and the Gateway URL should be set to https://test.authorize.net/gateway/transact.dll. For Live accounts this should be chagned to https://secure.authorize.net/gateway/transact.dll
Other than that the configuration is pretty straightforward. In the Magento Admin the Authoize.net Direct Post configuration should look something like this:

I hope this helps get you up and running with this very simple and secure payment method. Please feel free to drop any questions in the comments.
Step 1 :
Make sure that your Authorize.net account is a "Card Not Present" (CNP) account. You can confirm whether or not your Authorize.net account is setup for CNP transactions by logging in to the Merchant Account Admin and verifying that you have CNP features like Recurring Billing and Fraud Detection Suite listed in the Tools section.
If you do not see these options or you get errors like "Transactions of this market type cannot be processed on this system" when attempting to authorize payments, the issue is most likely that the account is setup for card present transactions only. If you are using a test account the easiest solution is to just create a new account and make sure to select Card Not Present.
Step 2 :
Make sure to set an MD5-Hash. DPM uses an MD5-Hash as a sort of secret key that is set in in the auth.net merchant admin and the Magento admin to help secure comminication between your magento store and auth.net. If during checkout, after entering credit card information and clicking "Place Order", you get a pop-up alert saying "Response hash validation failed. Transaction declined." the problem is most likely that this is not set.
Step 3 :
Set an MD5-Hash in the Authorize.net merchant admin under Settings > Security Settings > General Security Settings > MD5-Hash. Then enter that same value in the Magento Admin under System > Configuration > Payment Methods > Authorize.net Direct Post > Merchant MD5.
Step 4 :
Make sure that your server's time is set correctly. DPM makes use of a timestamp as a security measure and to help synchronize requests. If the server's time is incorrect you may receive a pop up stating "Gateway error: This transaction cannot be accepted." This is a generic error message. To get more specific error information you can go into app/code/core/Mage/Authorizenet/Model/Directpost.php and either log or dump $response in function process() by doing something like var_dump($reponse); die(); to output the response from auth.net.
If you get a response code 3 with a response reason code of 97 the timestamp value submitted in x_fp_timestamp is either 15 minutes ahead, or 15 minutes behind in Greenwich Mean Time (GMT) (this is the equivalent of 900 seconds ahead or 900 seconds behind in Coordinated Universal Time, or UTC). You can test your timestamps accuracy using this tool http://developer.authorize.net/tools/responsecode97/ .
On linux you can get the server time using the date command. If it is incorrect consider setting up Network Protocol Time by doing soething like this: http://alienlayer.com/install-and-configure-ntp-to-synchronize-the-system-clock-on-centos/
Step 5 :
Make sure to set the Gateway URL correctly. For test accounts Test Mode should be set to NO and the Gateway URL should be set to https://test.authorize.net/gateway/transact.dll. For Live accounts this should be chagned to https://secure.authorize.net/gateway/transact.dll
Other than that the configuration is pretty straightforward. In the Magento Admin the Authoize.net Direct Post configuration should look something like this:
I hope this helps get you up and running with this very simple and secure payment method. Please feel free to drop any questions in the comments.
YII
Export to Excel from Grid view in YII Framework 2.0
In this article, we are going to discuss about How to export the grid view data in to excel in YII Frameworkk 2.0. The Yii PHP project started on January 1, 2008, in order to fix some drawbacks of the PRADO framework.
For example, in its early versions PRADO was slow when handling complex pages, had a steep learning curve and many controls were difficult to customize, while Yii was much more efficient at that time. In October 2008, after ten months of private development, the first alpha version of Yii was released. On December 3, 2008, Yii 1.0 was formally released.
Step 1 : Install PHP Excel In Yiiframework 2.0
Add below line in composer.json and update composer to install phpoffice excel.
"require": {
......
"phpoffice/phpexcel": "*"
......
}
Step 2 : Excel Gridview Class In Yiiframework 2.0
Create a class file with name 'ExcelGrid.php' by extending the basic GridView class.
<?php
namespace app\components;
use Yii;
use Closure;
use yii\i18n\Formatter;
use yii\base\InvalidConfigException;
use yii\helpers\Url;
use yii\helpers\Html;
use yii\helpers\Json;
use yii\helpers\ArrayHelper;
use yii\widgets\BaseListView;
use yii\base\Model;
use \PHPExcel;
use \PHPExcel_IOFactory;
use \PHPExcel_Settings;
use \PHPExcel_Style_Fill;
use \PHPExcel_Writer_IWriter;
use \PHPExcel_Worksheet;
class ExcelGrid extends \yii\grid\GridView
{
public $columns_array;
public $properties;
public $filename='excel';
public $extension='xlsx';
private $_provider;
private $_visibleColumns;
private $_beginRow = 1;
private $_endRow;
private $_endCol;
private $_objPHPExcel;
private $_objPHPExcelSheet;
private $_objPHPExcelWriter;
public function init(){
parent::init();
}
public function run(){
//$this->test();
$this->init_provider();
$this->init_excel_sheet();
$this->initPHPExcelWriter('Excel2007');
$this->generateHeader();
$row = $this->generateBody();
$writer = $this->_objPHPExcelWriter;
$this->setHttpHeaders();
$writer->save('php://output');
Yii::$app->end();
//$writer->save('test.xlsx');
parent::run();
}
public function init_provider(){
$this->_provider = clone($this->dataProvider);
}
public function init_excel_sheet(){
$this->_objPHPExcel=new PHPExcel();
$creator = '';
$title = '';
$subject = '';
$description = 'Excel Grid';
$category = '';
$keywords = '';
$manager = '';
$created = date("Y-m-d H:i:s");
$lastModifiedBy = '';
extract($this->properties);
$this->_objPHPExcel->getProperties()
->setCreator($creator)
->setTitle($title)
->setSubject($subject)
->setDescription($description)
->setCategory($category)
->setKeywords($keywords)
->setManager($manager)
->setCompany($company)
->setCreated($created)
->setLastModifiedBy($lastModifiedBy);
$this->_objPHPExcelSheet = $this->_objPHPExcel->getActiveSheet();
}
public function initPHPExcelWriter($writer)
{
$this->_objPHPExcelWriter = PHPExcel_IOFactory::createWriter(
$this->_objPHPExcel,
$writer
);
}
public function generateHeader(){
$this->setVisibleColumns();
$sheet = $this->_objPHPExcelSheet;
$colFirst = self::columnName(1);
$this->_endCol = 0;
foreach ($this->_visibleColumns as $column) {
$this->_endCol++;
$head = ($column instanceof \yii\grid\DataColumn) ? $this->getColumnHeader($column) : $column->header;
$cell = $sheet->setCellValue(self::columnName($this->_endCol) . $this->_beginRow, $head, true);
}
$sheet->freezePane($colFirst . ($this->_beginRow + 1));
}
public function generateBody()
{
$columns = $this->_visibleColumns;
$models = array_values($this->_provider->getModels());
if (count($columns) == 0) {
$cell = $this->_objPHPExcelSheet->setCellValue('A1', $this->emptyText, true);
$model = reset($models);
return 0;
}
$keys = $this->_provider->getKeys();
$this->_endRow = 0;
foreach ($models as $index => $model) {
$key = $keys[$index];
$this->generateRow($model, $key, $index);
$this->_endRow++;
}
// Set autofilter on
$this->_objPHPExcelSheet->setAutoFilter(
self::columnName(1) .
$this->_beginRow .
":" .
self::columnName($this->_endCol) .
$this->_endRow
);
return ($this->_endRow > 0) ? count($models) : 0;
}
public function generateRow($model, $key, $index)
{
$cells = [];
/* @var $column Column */
$this->_endCol = 0;
foreach ($this->_visibleColumns as $column) {
if ($column instanceof \yii\grid\SerialColumn || $column instanceof \yii\grid\ActionColumn) {
continue;
} else {
$format = $column->format;
$value = ($column->content === null) ?
$this->formatter->format($column->getDataCellValue($model, $key, $index), $format) :
call_user_func($column->content, $model, $key, $index, $column);
}
if (empty($value) && !empty($column->attribute) && $column->attribute !== null) {
$value =ArrayHelper::getValue($model, $column->attribute, '');
}
$this->_endCol++;
$cell = $this->_objPHPExcelSheet->setCellValue(self::columnName($this->_endCol) . ($index + $this->_beginRow + 1),
strip_tags($value), true);
}
}
protected function setVisibleColumns()
{
$cols = [];
foreach ($this->columns as $key => $column) {
if ($column instanceof \yii\grid\SerialColumn || $column instanceof \yii\grid\ActionColumn) {
continue;
}
$cols[] = $column;
}
$this->_visibleColumns = $cols;
}
public function getColumnHeader($col)
{
if(isset($this->columns_array[$col->attribute]))
return $this->columns_array[$col->attribute];
/* @var $model yii\base\Model */
if ($col->header !== null || ($col->label === null && $col->attribute === null)) {
return trim($col->header) !== '' ? $col->header : $col->grid->emptyCell;
}
$provider = $this->dataProvider;
if ($col->label === null) {
if ($provider instanceof ActiveDataProvider && $provider->query instanceof ActiveQueryInterface) {
$model = new $provider->query->modelClass;
$label = $model->getAttributeLabel($col->attribute);
} else {
$models = $provider->getModels();
if (($model = reset($models)) instanceof Model) {
$label = $model->getAttributeLabel($col->attribute);
} else {
$label =$col->attribute;
}
}
} else {
$label = $col->label;
}
return $label;
}
public static function columnName($index)
{
$i = $index - 1;
if ($i >= 0 && $i < 26) {
return chr(ord('A') + $i);
}
if ($i > 25) {
return (self::columnName($i / 26)) . (self::columnName($i % 26 + 1));
}
return 'A';
}
protected function setHttpHeaders()
{
header("Cache-Control: no-cache");
header("Expires: 0");
header("Pragma: no-cache");
header("Content-Type: application/{$this->extension}");
header("Content-Disposition: attachment; filename={$this->filename}.{$this->extension}");
}
}
Add the above class in 'project/components' folder and defined namespace as
namespace app\components;
Step 3 : Gridview To Excel In Yiiframework 2.0
After completed above steps, Just you have to call 'ExcelGrid' widget using namespace to export data as excel in yii2.
Excel.php
<?php
\app\components\ExcelGrid::widget([
'dataProvider' => $dataProvider,
'filterModel' => $searchModel,
//'extension'=>'xlsx',
//'filename'=>'excel',
'properties' =>[
//'creator' =>'',
//'title' => '',
//'subject' => '',
//'category' => '',
//'keywords' => '',
//'manager' => '',
],
'columns' => [
['class' => 'yii\grid\SerialColumn'],
'username',
'createdby',
'createdon',
],
]);
?>
Controller.php
<?php
............
class CategoryController extends Controller
public function actionExcel()
{
$searchModel = new categorySearch();
$dataProvider = $searchModel->search(Yii::$app->request->queryParams);
return $this->renderPartial('excel', [
'searchModel' => $searchModel,
'dataProvider' => $dataProvider,
]);
}
public function actionIndex()
{
$searchModel = new categorySearch();
$dataProvider = $searchModel->search(Yii::$app->request->queryParams);
return $this->render('index', [
'searchModel' => $searchModel,
'dataProvider' => $dataProvider,
]);
}
............
?>
Wordpress
Adding Mailchimp forms to Wordpress site
Email marketing is an effective way of reminding people to visit your site and keep them updated through your newsletters. It is a great tool to reach to thousands of people who have voluntarily signed up to your mailing list to receive updates from you. However, before any email marketing efforts can be done, you will need to collect an email list.
Collecting an email list is not an easy task. Many email newsletter companies will provide you a link to a page that contains an email capture form that is hosted by them. This means every time a visitor tries to sign up to your mailing list they will have to exit your site.
Adding a New MailChimp Form
To add a new MailChimp list you will need to obtain an API key and the List Id of the specific list you want to display on your site. This setup enables you to host multiple MailChimp lists/forms even from multiple accounts.
Publishing MailChimp Forms
In pages/posts
Big Mailchimp adds a new meta-box in post/page edit page alongside of your WYSIWIG editor for ease of access. Use the Screen Options on the top right corner of the page to enable/disable this box. Use Big MailChimp meta box to select the list you want to display on a page/post. Toggle the checkbox to only display required fields if necessary. Click `Insert Into Page`. This will produce the shortcode and place it on the visual editor.

The generated shortcode format is
...
[bigmailchimp list_id=# required_fields=1]
...
The shortcode identifier is `bigmailchimp`. It takes two parameters list_id and required_fields.
list_id (required) The id of the list saved in your database.
default: none
required_fields (optional) Whether to show required fields only or display the entire form. Possible values are 0 or 1
default: 0
Display MailChimp forms in widget areas
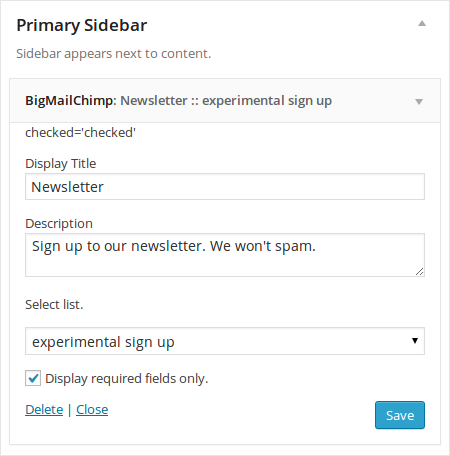
Navigate to the Appearance menu and select Widgets. Under Available Widgets drag and drop the Big MailChimp widget into a widget area (Sidebar/Footer Area). Here you can add a title and a brief description to your form. Select the list/form you want to display from the widget settings and decide to display the full form or just the required fields. Repeat these step to add other lists/forms.
Collecting an email list is not an easy task. Many email newsletter companies will provide you a link to a page that contains an email capture form that is hosted by them. This means every time a visitor tries to sign up to your mailing list they will have to exit your site.
Adding a New MailChimp Form
To add a new MailChimp list you will need to obtain an API key and the List Id of the specific list you want to display on your site. This setup enables you to host multiple MailChimp lists/forms even from multiple accounts.
- Navigate to Big MailChimp page
- Click Add New
- Enter your Api Key and MailChimp List id
- Modify the submit button text or leave the default (Subscribe to list)
- Decide whether you want the double opt-in enabled or disabled
- Click Save Changes
Publishing MailChimp Forms
In pages/posts
Big Mailchimp adds a new meta-box in post/page edit page alongside of your WYSIWIG editor for ease of access. Use the Screen Options on the top right corner of the page to enable/disable this box. Use Big MailChimp meta box to select the list you want to display on a page/post. Toggle the checkbox to only display required fields if necessary. Click `Insert Into Page`. This will produce the shortcode and place it on the visual editor.
The generated shortcode format is
...
[bigmailchimp list_id=# required_fields=1]
...
The shortcode identifier is `bigmailchimp`. It takes two parameters list_id and required_fields.
list_id (required) The id of the list saved in your database.
default: none
required_fields (optional) Whether to show required fields only or display the entire form. Possible values are 0 or 1
default: 0
Display MailChimp forms in widget areas
Navigate to the Appearance menu and select Widgets. Under Available Widgets drag and drop the Big MailChimp widget into a widget area (Sidebar/Footer Area). Here you can add a title and a brief description to your form. Select the list/form you want to display from the widget settings and decide to display the full form or just the required fields. Repeat these step to add other lists/forms.
CodeIgniter
PDF Generator Library for CodeIgniter
In this article, we are going to discuss about How to install PDF generator library for CodeIgniter and How to use PDF generator library in CodeIgniter. CodeIgniter is an open source rapid development web application framework, for use in building dynamic web sites with PHP.
CodeIgniter is loosely based on the popular Model-View-Controller development pattern. While controller classes are a necessary part of development under CodeIgniter, models and views are optional.
Installation
Usage
You can convert a view into a PDF by using the following code.
$this->load->library('pdf');
$this->pdf->load_view('welcome');
$this->pdf->render();
$this->pdf->stream("welcome.pdf");
You can also pass in data to the function just as you would using $this->load->view('welcome', $data); by using
$this->pdf->load_view('welcome', $data);
CodeIgniter is loosely based on the popular Model-View-Controller development pattern. While controller classes are a necessary part of development under CodeIgniter, models and views are optional.
Installation
- Drop the pdf.php library into your libraries directory.
- Download domPDF from http://code.google.com/p/dompdf/downloads/list
- Drop the dompdf directory into your libraries directory alongside the pdf.php file.
Usage
You can convert a view into a PDF by using the following code.
$this->load->library('pdf');
$this->pdf->load_view('welcome');
$this->pdf->render();
$this->pdf->stream("welcome.pdf");
You can also pass in data to the function just as you would using $this->load->view('welcome', $data); by using
$this->pdf->load_view('welcome', $data);
No more posts to load.