CodeIgniter
Create Ajax Pagination in CodeIgniter - Step by step procedure
In my previous article, I have explained about how to install and configure the Codeigniter on your localhost. In this article, I'm going to describe How to create a Ajax pagination in Codeigniter. Codeigniter has many buil-in classes and plugins. Codeigniter pagination is easy to use.
Step 1:
Download the Pagination classes from the Codeigniter site.
Click Here to download the Codeigniter Ajax pagination library files.
Step 2:
Put the Ajax pagination library files to the "system/libraries" folder.
Step 3:
Also download the prototype.js file and place anywhere on your root.
Step 4:
Create a database table to store and retrieve the records to apply the pagination.
CREATE TABLE `my_best_friends` (
`f_id` int(11) NOT NULL auto_increment,
`f_name` varchar(100) NOT NULL,
`f_phone` int(11) NOT NULL,
`f_email` int(11) NOT NULL,
`f_address` int(11) NOT NULL,
PRIMARY KEY (`f_id`)
)
Step 5:
Add the below code in your "Controller" file
class Paging extends Controller {
function Paging(){
parent::Controller();
$this->load->helper(array('form','url'));
$this->load->helper('text');
$this->load->library('Ajax_pagination');
}
function index()
{
redirect ('paging/my_friends');
}
function my_friends()
{
$pdata['TotalRec'] = $this->FriendsModel->TotalRec();
$pdata['perPage'] = $this->perPage();
$pdata['ajax_function'] = 'get_friends_ajax';
$subdata['paging'] = $this->parser->parse('paging', $pdata,
TRUE);
$subdata['all_friends'] = $this->FriendsModel->my_friends
($this->perPage());
$data['body_content'] = $this->parser->parse('friend_list',
$subdata, TRUE);
$this->load->view('main',$data);
}
function get_friends_ajax()
{
$pdata['TotalRec'] = $this->FriendsModel->TotalRec();
$pdata['perPage'] = $this->perPage();
$pdata['ajax_function'] = 'get_friends_ajax';
$data['paging'] = $this->parser->parse('paging', $pdata, TRUE);
$data['all_friends'] = $this->FriendsModel->my_friends($this->perPage());
$this->load->view('friend_list',$data);
}
function PerPage()
{
return 5;
}
}
Step 6:
Add the below code in your "Model" file
class FriendsModel extends Model
{
function FriendsModel()
{
parent::Model();
}
function TotalRec()
{
$sql = "SELECT * FROM my_friends";
$q = $this->db->query($sql);
return $q->num_rows();
}
function my_friends($perPage)
{
$offset = $this->getOffset()
$query ="SELECT * FROM my_friends Order By f_id Desc LIMIT ".$offset.", ".$perPage;
$q = $this->db->query($query);
return $q->result();
}
function getOffset()
{
$page = $this->input->post('page');
if(!$page):
$offset = 0;
else:
$offset = $page;
endif;
return $offset;
}
}
Step 7:
Add the below code in your "paging.php" file in "application/views/" folder.
$config['first_link'] = 'First';
$config['div'] = 'container'; //Div tag id
$config['base_url'] = base_url().'paging/'.$ajax_function;
$config['total_rows'] = $TotalRec;
$config['per_page'] = $PerPage;
$config['postVar'] = 'page';
$this->ajax_pagination->initialize($config);
echo $this->ajax_pagination->create_links();
Step 8:
Add the below code in your "friend_list.php" file in "application/views/" folder.
<table border="1" width="200">
<tbody>
<tr>
<td>Friend Name</td>
<td>Friend Phone</td>
<td>Friend Address</td>
</tr>
foreach($all_friends as $row)
{
<tr>
<td>echo $row->f_name</td>
<td>echo $row->f_phone</td>
<td>echo $row->f_address</td>
</tr>
}</tbody>
</table>
Step 9:
In main home page.,
Add the below code to your "main.php" file in "application/views/" folder. This file
contains your html code and all css and js files.
<div id="container">
echo @$body_content;
</div>
Click Here to learn more about How to Install and configure codeigniter on your localhost.
CodeIgniter
Installing and Configuring Codeigniter framework on localhost
In this tutorial, we are going to discuss about how to install and configure the Codeigniter (CI) PHP framework on your localhost. Configuring codeigniter to our localhost is so simple and easy. In this article I will explain the step bt step procedure to install and configure Codeigniter framework on your localhost.
1, Download Codeigniter system folder from codeigniter.com
2, Now unzip it and paste it
3, After unzipping folder copy this folder to your localhost server and change its name to some thing like “mywork”.
4, Update system/application/config/config.php file. Change base url to your localhost path.
5, Give DB name to system/application/config/database.php which you create on localhost.
Now its ready to use just go to your browser and access your first testing codeigniter configured site on localhost.
Zend
Reading and Writing Session Data Using Zend Session Namespace
In this article we are going to discuss about how to reading and writing the session data using the Zend Session Namespace in Zend Framework. Also discuss about some useful techniques of Zend Framework session and Session Namespace.
In Zend framework, you can use both Zend_Session and Zend_Session_Namespace which extends abstract class Zend_Session_Abstract. So these two inherited methods are available in Zend_Session_Abstract automatically. In Zend/Session/Abstract.php file, you can find all functions related to session handling.
$mysession = new Zend_Session_Namespace(’Namespace’);
The argument for namespace is optional, but it’s better to pass it. if you don’t pass it, Zend Session Namespace will assign its name a string “default”. To store values in session variable, you will need to do the following.
$mysession->fruits = ‘Apple’;
Below is the example code to retrieve values from session.
$yoursession = new Zend_Session_Namespace(’Namespace’);
$fruits = $yoursession->fruits;
If you want to go deep, you can get many useful functions in Zend_Session_Abstract.php, Zend_Session_Nampspace.php, and Zend_Session.php.
Wordpress
A step by step procedure to develop wordpress plugin
WordPress provides easy way to create and manage your blog. you can easily modify, customize and enhance functionality of your WordPress blog. You don’t need to change the core functionality of your WordPress blog. it provides easy way to add functionality with WordPress plugins. A WordPress plugin is a progam or can say a set of one or more functions which is written in the PHP scripting language which adds a specific set of features to your WordPress blog.
Step 1 : File Structure
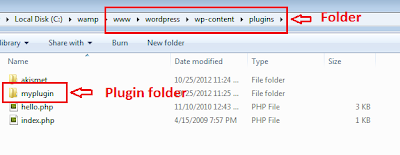
In wordpress, the plugin directory is available inside the wp-content directory. All plugin folders are available inside the wp-content folder. For smaller plugins which only have single filname.php file, can be placed directly into plugin/ directory. Howerver when you have more complicated functionality then it is useful to create a sub directory named after your plugin. you can also keep your Javascript, CSS, and html include into your individual plugin.You can also add read.txt if you are palnning to offering your plugin for download. This file will contain your plugin name and what the plugin does.
Step 2 : Writing code for simple plugin
Create a simple php file named with the plugins specified name.
Ex: Here my plugin name is "myplugin", so my file name is "myplugin.php".
Write the following codes inside the "myplugin.php" file.
<?php
/*
Plugin Name: My Plugin
Plugin URI: http://www.pluginurlhere.com/
Version: Current Version
Author: Name please
Description: What does your plugin do and what features does it offer…
*/
?>
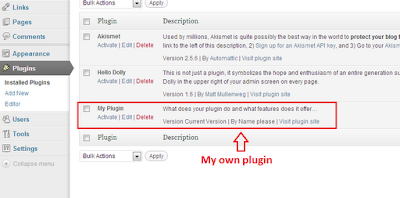
Once you write the code the in the php file, it will show up in your admin panel. For your reference, check the below image.
Step 3 : Naming conventions and Best practices
WordPress doesn’t need any specific code structure into your plugin. if you are well versed with php oops concept, then its best to handle using class and functions.
Since there are so many internal functions already defined you can avoid duplicates by prefixing a label to all your variables and function names.
<?php
define("Variable", "Varriable label value");
function content_example_function( $limit ) {
// some code goes here
}
?>
Step 4 : Diving Into Hooks, Actions and Filters
Hooks are provided by wordpress which allows your plugin to hook into the core functionality of your blog. The hooks are divided into two parts that’s Actions and Filters.
Actions are occured during specific events. Below are list of few important actions of Worpdress.
add_action('save_post', 'notify');
In above code have two variables, the first holds the name of our hook we’re targeting. In this case save_post which means whenever a new post is saved we’re going to call our function defined in the second parameter. You could obviously update notify to be whatever function name you’d want to run, however this isn’t required for our current example plug-in.
Filters are occurred to modify text of various types before adding it to the database or sending it to the browser screen. your plugin can specify that one or more of its PHP functions is executed to modify specific types of text at these times, using the Filter API. For example, you may create a filter to change $the_content which is a variable set by WordPress containing the entire post content of a WordPress article. For our plug-in we will be taking $the_content and shortening the length of characters into an excerpt.
Actually Filters are handy when you are writing plug-ins to customize the looks and feel of your blog. These are especially popular when writing sidebar widgets or smaller functions to change how a post should be displayed. Below is a sample line of code showing how to apply a filter.
add_filter('wp_title', 'func');
Step 5 : Complete Plugin Logic
This is a complete logic of our plugin. it can be placed inside your theme’s function.php file. the purpose of this code is to limit the range of post content.
<?php
function myplugin_excerpts_content( $limit ) {
$content = explode( ' ', get_the_content(), $limit );
if ( count( $content ) >= $limit ) {
array_pop( $content );
$content = implode(" ",$content).'…';
} else {
$content = implode(" ",$content);
}
$content = preg_replace('/\[.+\]/','', $content);
$content = apply_filters('the_content', $content);
return $content;
}
?>
The above code just require general understanding of how your functions should be written. you will notice that we are using a call to apply_filters which is another WordPress-specific function.
The function above is named myplugin_excerpts_content(). This only requires 1 parameter named $limit. This could also be shortened to $limit which should store an integer specifying how many characters to limit your excerpt to. The content is used on full post pages and also static pages like about us, contact etc.
<?php
echo myplugin_excerpts_content(60);
// display page content limited at 60 chars
?>
Step 6 : Installing And Running The Plugin
This is just a general description how to develop wordpress plugin. if you want to run the code above. simply download the plugin file and rename it to .php file. Then upload this file to your blog’s /wp-content/plugins directory.
After uploading plugin file, go the the admin panel and browse your plugin and make it active. Once you activate nothing new will happen, until we manually add in our function call. To do this simply navigate Appearance -> Editor and look for single.php. This file contains all the HTML/CSS for your basic article post page. Scroll down until you find the_content() and replace with the example code above. this will limit all your article pages to 60 charaters. you can also add this function to other files.
In this article I have presents just a general idea of how you can start working with WordPress plugin development AS you gone through this small article, you can understand that plugin has very vast and deep internal functionality. But you can easily command over by start from here or also through WordPress official Documentation, development community and forums.
Joomla
Create Back End Component in Joomla - Step by step procedure
In my previous post, I have explained about how to create our own Front End Component in Joomla. In this post I will explain about How to create a Back End Component in Joomla and how to activate and execute the Back End Component in Joomla. Back End means, only an administrator can access this page. So we are going to work under the "Administrator" folder. Joomla separates the folder between front end and back end.
Here are the steps:
Step 1:
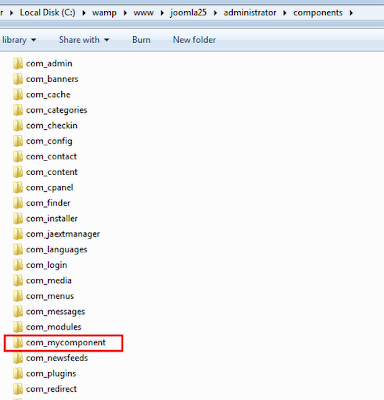
Create a folder for your component in Joomla administrator components directory.
Ex: root folder/administrator/components/com_mycomponent
Here "com_mycomponent" is our new component name.
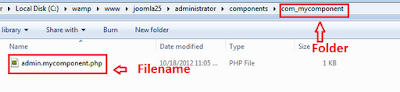
Step 2:
Create a file "admin.mycomponent.php" inside the "com_mycomponent" folder.
Here are the steps:
Step 1:
Create a folder for your component in Joomla administrator components directory.
Ex: root folder/administrator/components/com_mycomponent
Here "com_mycomponent" is our new component name.
Step 2:
Create a file "admin.mycomponent.php" inside the "com_mycomponent" folder.
Step 3:
Write the following code in the "admin.mycomponent.php" file.
<?php
defined( '_JEXEC' ) or die( 'Restricted access' );
echo 'Welcome to my Own Joomla Back end Component';
?>
Step 4:
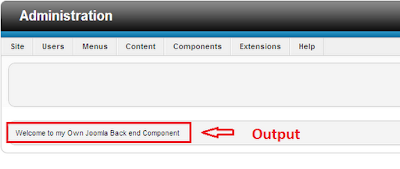
Test the above component by accessing
http://localhost/joomla25/administrator/index.php?option=com_mycomponent
The final output will be.,
Click Here to see my previous post, Create Front End Component in Joomla - Step by step procedure.
Joomla
Create Front End Component in Joomla - Step by step procedure
In this tutorial we are going discuss about how to create a Front End Component in Joomla. Here I will explain how to create a component and how to display in the browser.
Step 1:
Create a folder for your component in Joomla components directory.
Ex: root folder/components/com_mycomponent
Here "com_mycomponent" is our new component name.
 Step 2:
Create a file "mycomponent.php" inside the "com_mycomponent" folder.

Step 1:
Create a folder for your component in Joomla components directory.
Ex: root folder/components/com_mycomponent
Here "com_mycomponent" is our new component name.
Create a file "mycomponent.php" inside the "com_mycomponent" folder.
Step 3:
Write the following code in the "mycomponent.php" file.
<?php

defined( '_JEXEC' ) or die( 'Restricted access' );
echo '<div class="componentheading">Welcome to my Own Joomla Front end Component</div>';

?>
Step 4:
Test the above component by accessing
http://localhost/joomla25/index.php?option=com_mycomponent
The final output will be.,

In my next post, I will explain about how to create our own Back End Component in joomla.
CodeIgniter
Codeigniter - Sending Email from your Gmail account
Codeigniter provides many built in helpers and libraries which help us to perform lot of functionality for developing projects. Here a simple email library make us able to send email using our Gmail account living in CI environment.
<?
class Send_Email extends Controller
{
function Send_Email()
{
parent::Controller();
}
function index()
{
$config = Array(
'protocol' => 'smtp',
'smtp_host' => 'ssl://smtp.googlemail.com',
'smtp_port' => 465,
'smtp_user' => 'email_address@gmail.com', // change it to yours
'smtp_pass' => 'your_password', // change it to yours
'mailtype' => 'html',
'charset' => 'iso-8859-1',
'wordwrap' => TRUE
);
$this->load->library('email', $config);
$this->email->set_newline("\r\n");
$this->email->from('your_email@domain.com'); // change it to yours
$this->email->to('your_email@domain.com'); // change it to yours
$this->email->subject('Email using Gmail.');
$this->email->message('Working fine ! !');
if($this->email->send())
{
echo 'Email sent.';
}
else
{
show_error($this->email->print_debugger());
}
}
}
?>
CodeIgniter
Authorize.Net Payment Gateway integration with Codeigniter
Authorize.Net is a favorite payment mode used in web development. It is simple, easy and secure payment connection. I use authorize.Net in my codeigniter based projects and here is the code.
This is helper for payment.
function do_payment ($post_values)
{
$post_url = "https://test.authorize.net/gateway/transact.dll";
// This section takes the input fields and converts them to the proper format
$post_string = "";
foreach( $post_values as $key => $value )
{ $post_string .= "$key=" . urlencode( $value ) . "&"; }
$post_string = rtrim( $post_string, "& " );
// This sample code uses the CURL library for php to establish a connection,
// submit the post, and record the response.
// If you receive an error, you may want to ensure that you have the curl
// library enabled in your php configuration
$request = curl_init($post_url); // initiate curl object
curl_setopt($request, CURLOPT_HEADER, 0); // set to 0 to eliminate header info from response
curl_setopt($request, CURLOPT_RETURNTRANSFER, 1); // Returns response data instead of TRUE(1)
curl_setopt($request, CURLOPT_POSTFIELDS, $post_string); // use HTTP POST to send form data
curl_setopt($request, CURLOPT_SSL_VERIFYPEER, FALSE); // uncomment this line if you get no gateway response.
$post_response = curl_exec($request); // execute curl post and store results in $post_response
// additional options may be required depending upon your server configuration
// you can find documentation on curl options at http://www.php.net/curl_setopt
curl_close ($request); // close curl object
// This line takes the response and breaks it into an array using the specified delimiting character
$response_array = explode($post_values["x_delim_char"],$post_response);
// The results are output to the screen in the form of an html numbered list.
if($response_array)
{
return $response_array;
}
else { return ''; }
}
And here is your controller function:
function do_user_payment()
{
$this->load->library('auth_payment');
$card_expiration = $_POST['crMonth'].$_POST['crYear'];
$x_login = "login_key";
$x_tran_key = "trans_key";
$card_number = $_POST['ccn'];
$invoice_num = '';
$x_card_code = $_POST['CSV'];
$post_values['x_invoice_num'] = $invoice_num;
$post_values['x_login'] = $x_login;
$post_values['x_tran_key'] = $x_tran_key;
$post_values['x_card_code'] = $x_card_code;
$post_values['x_version'] = "3.1";
$post_values['x_delim_data'] = "TRUE";
$post_values['x_delim_char'] = "|";
$post_values['x_relay_response'] = "FALSE";
$post_values['x_type'] = "AUTH_CAPTURE"; //Optional
$post_values['x_method'] = "CC";
$post_values['x_card_num'] = $card_number;
$post_values['x_exp_date'] = $card_expiration;
$post_values['x_amount'] = 'Your Charges';
$post_values['x_first_name'] = $user_first_name; //Optional (From Client)
$post_values['x_last_name'] = $user_last_name; //Optional (From Client)
$post_values['x_address'] = $user_address1; //Optional (From Client)
$post_values['x_state'] = $user_state; //Optional (From Client)
$post_values['x_zip'] = $user_zip; //Optional (From Client)
//Calling Payment function
$paymentResponse = $this->auth_payment->do_payment($post_values);
if($paymentResponse[0]==1 && $paymentResponse[1]==1 && $paymentResponse[2]==1)
{
// payment is successful. Do your action here
}
else
{
// payment failed.
return $paymentResponse[3]; // return error
}
}
No more posts to load.